
この記事では、WordPressでブロック開発をした際のメモです。
WordPressで必要最低限のブロックを開発するには、@wordpress/create-blockパッケージを作成することですぐにできます。
create-blockパッケージの作成
新規のブロックエディターの登録は、プラグインの仕組みを利用して、行われます。
作業ディレクトリで以下のコマンドを実行すると、@wordpress/create-blockパッケージが作成されます。
npx @wordpress/create-block@latest myblock myblockの部分は、作成されるディレクトリの名称です。
@wordpress/create-blockパッケージは、ブロック作成及び登録に必要なファイル構造のテンプレートを作成してくれる公式パッケージです。
パッケージの実行時には、以下のような表示があります。Ok to proceed? (y)と表示されたら、yを入力しエンターを押します。
Need to install the following packages:
@wordpress/create-block@4.62.0
Ok to proceed? (y) y
Creating a new WordPress plugin in the /Users/xxx/Documents/Development/WordPress/myblock directory.
Creating a "block.json" file.
Creating a "package.json" file.
Installing `@wordpress/scripts` package. It might take a couple of minutes...
Formatting JavaScript files.
Compiling block.
Done: WordPress plugin Myblock bootstrapped in the /Users/xxx/Documents/Development/WordPress/myblock directory.
You can run several commands inside:
$ npm start
Starts the build for development.
$ npm run build
Builds the code for production.
$ npm run format
Formats files.
$ npm run lint:css
Lints CSS files.
$ npm run lint:js
Lints JavaScript files.
$ npm run plugin-zip
Creates a zip file for a WordPress plugin.
$ npm run packages-update
Updates WordPress packages to the latest version.
To enter the directory type:
$ cd myblock
You can start development with:
$ npm start
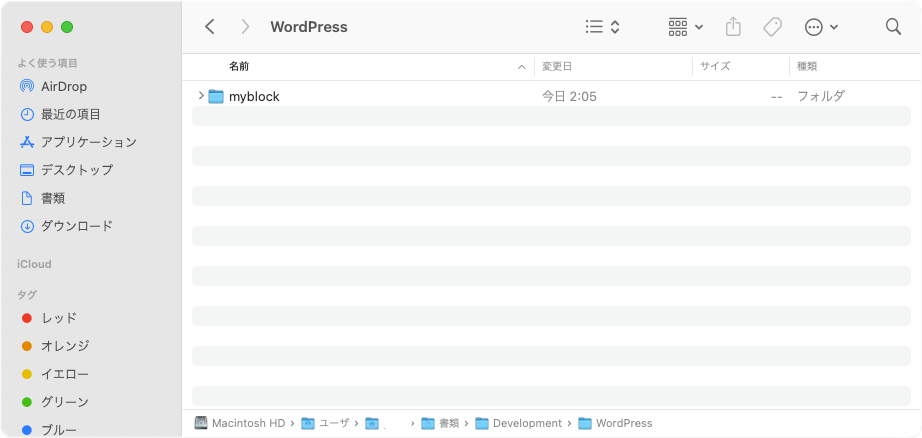
Code is Poetry次のように作業ディレクトリに、指定した名称のファルダが作成されます。
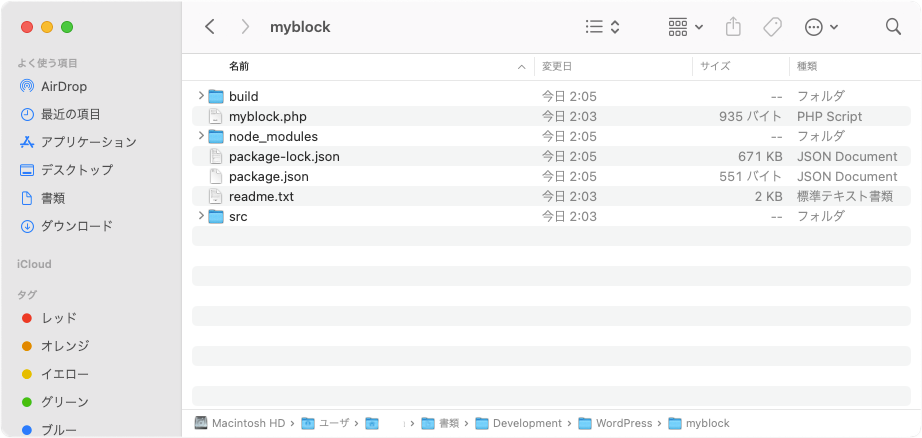
そのフォルダの中には、ブロックの作成に必要なファイルが作成された状態になっています。
wp-envの実行
作成したプラグインディレクトリに移動し、wp-env startを実行します。
cd myblock
wp-env start
実行に成功すれば、次のような表示が出ます。
⚠ Warning: could not find a .wp-env.json configuration file and could not determine if '/Users/xxx/Documents/Development/WordPress/myblock' is a WordPress installation, a plugin, or a theme.
WordPress development site started at http://localhost:8888
WordPress test site started at http://localhost:8889
MySQL is listening on port 61623
MySQL for automated testing is listening on port 61630

✔ Done! (in 19s 404ms)http://localhost:8888/wp-admin/より、ユーザー名:admin、パスワード:passwordで管理画面へログインします。
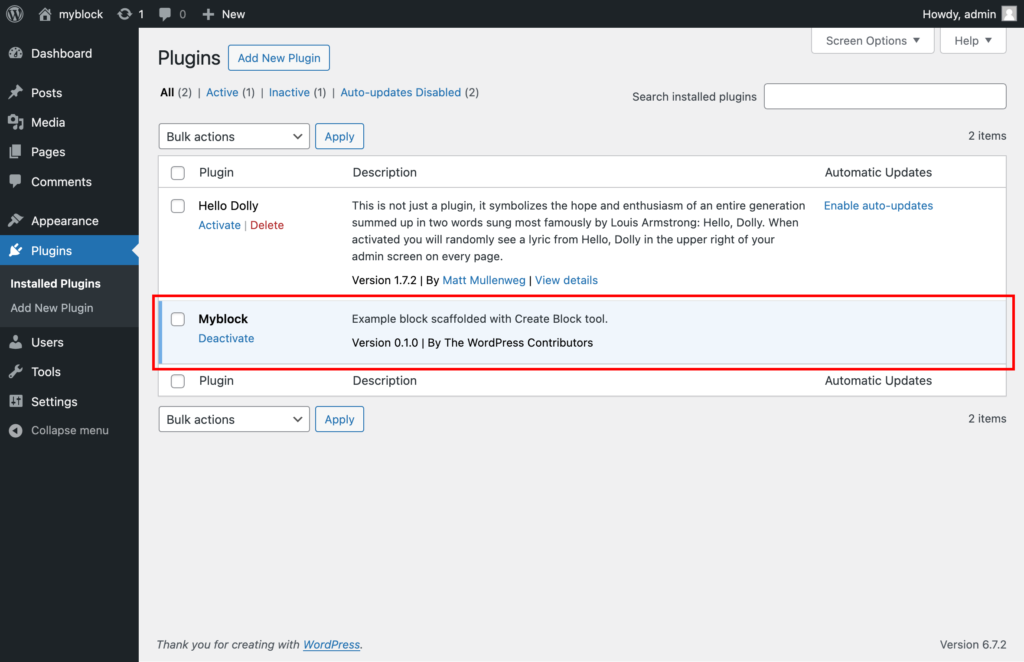
インストール済みプラグインを開くと、作成したブロックがプラグインとして存在していることがわかります。
ブロックの確認
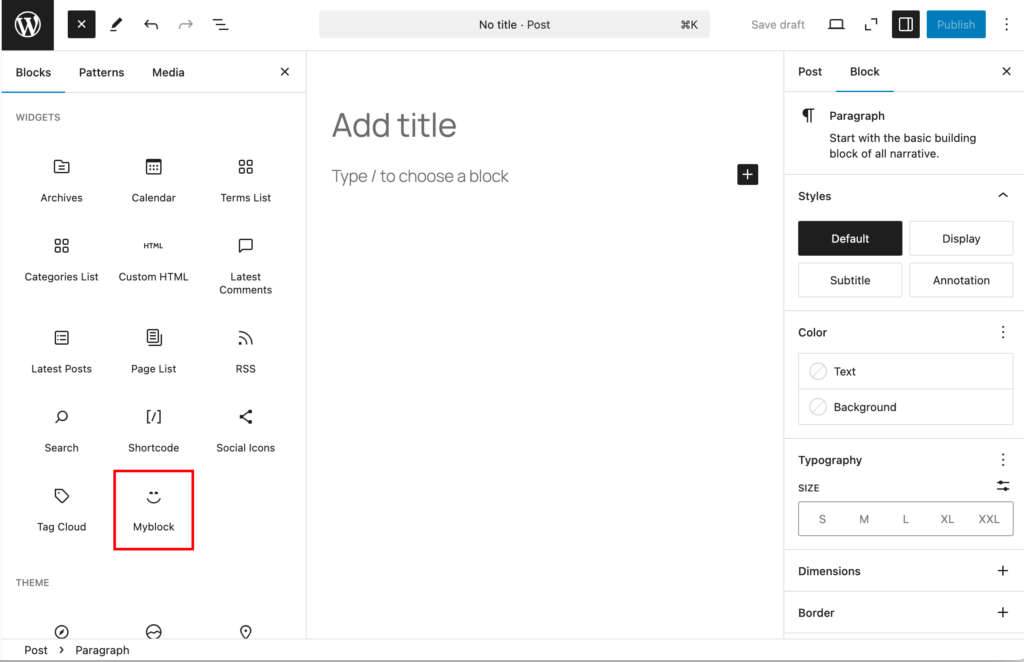
投稿画面で作成したブロックを確認します。
作成したブロックは、Widgetエリアに存在します。
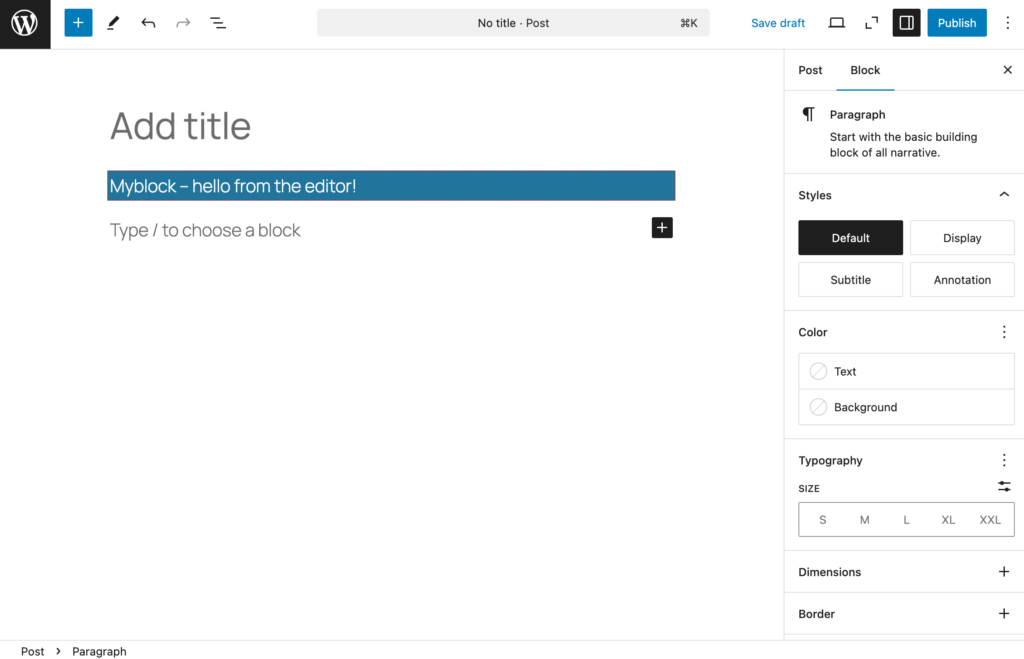
投稿文に挿入してみると、エディター画面では「Myblock – hello from the editor!」と表示されます。
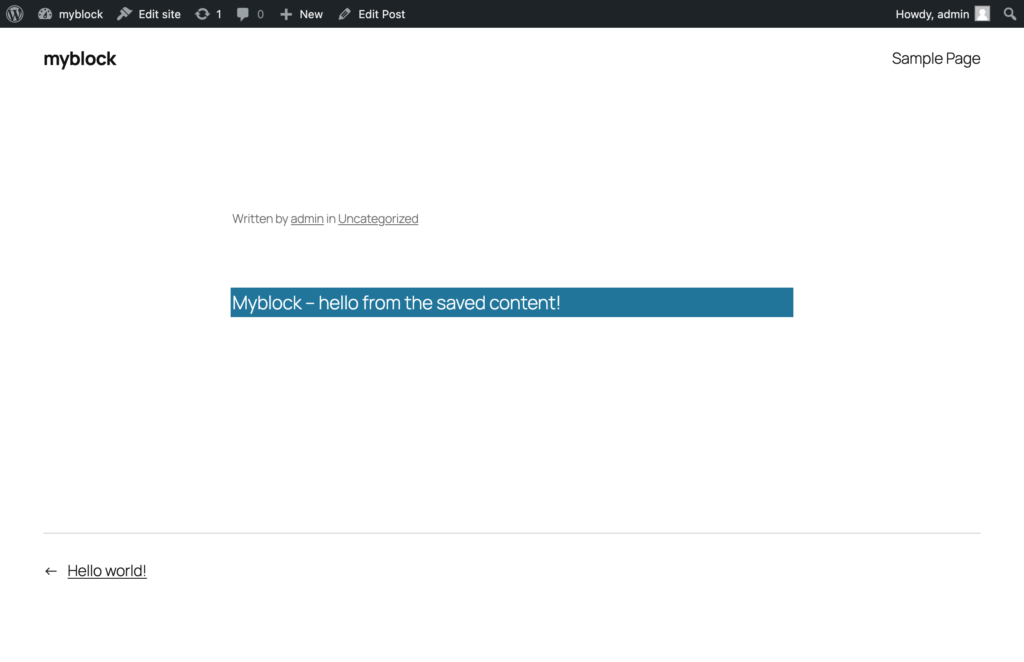
一方でプレビュー画面では、「Myblock – hello from the saved content!」と表示されます。
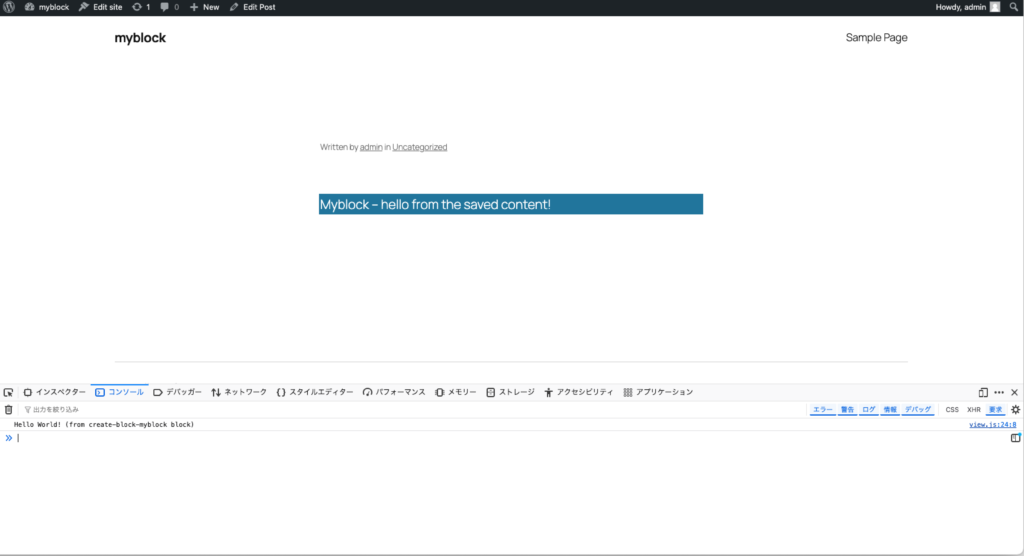
公開すると、プレビューと同様の表示に加えて、コンソールで出力が確認できます。
テンプレートで作成されたブロックは、閲覧する状況で表示される内容が変わる仕組みであることがわかります。
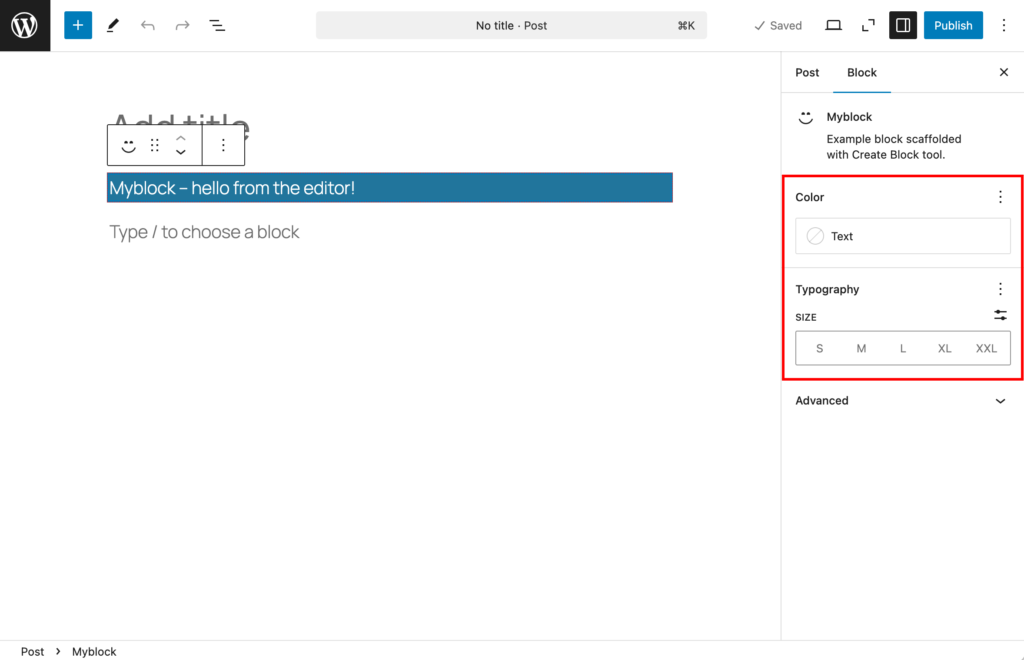
エディターに戻り、ブロックの設定項目を確認します。
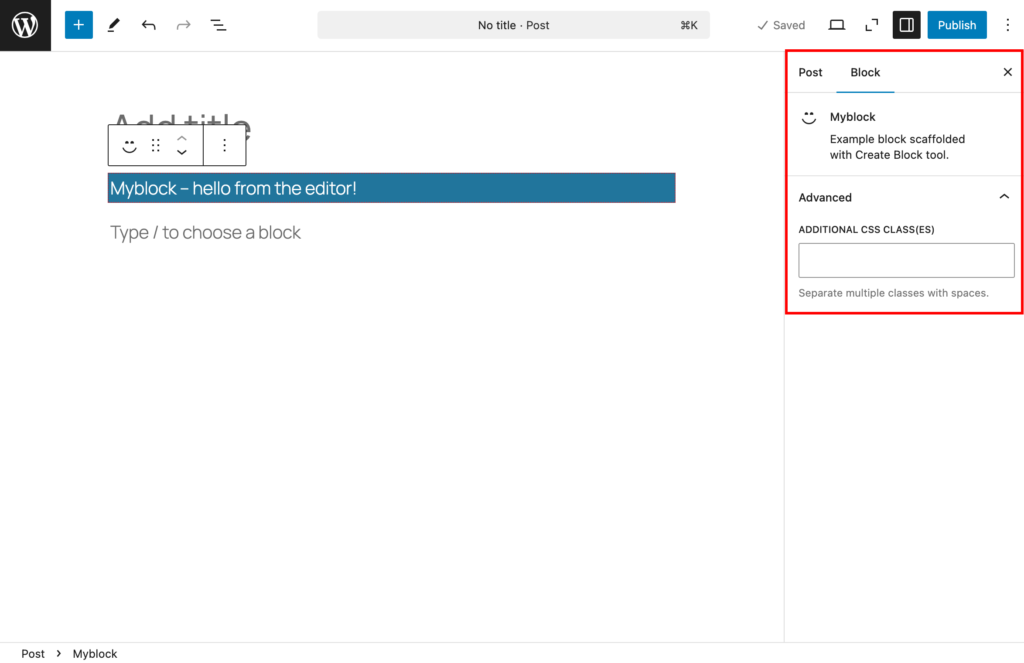
ブロックの項目は以下のようになっています。
- 名称:Myblock
- 説明:xxx
また追加CSSの設定が行えます。
ブロックの基本設定
作成したブロックの基本的な設定項目は、srcフォルダ内にあるblock.jsonに記載されています。
初期状態は以下の内容が記載されています。
{
	"$schema": "https://schemas.wp.org/trunk/block.json",
	"apiVersion": 3,
	"name": "create-block/myblock",
	"version": "0.1.0",
	"title": "Myblock",
	"category": "widgets",
	"icon": "smiley",
	"description": "Example block scaffolded with Create Block tool.",
	"example": {},
	"supports": {
		"html": false
	},
	"textdomain": "myblock",
	"editorScript": "file:./index.js",
	"editorStyle": "file:./index.css",
	"style": "file:./style-index.css",
	"viewScript": "file:./view.js"
}さきほど確認したブロックの名称と説明はそれぞれ、titleとdescriptionに対応した内容であることがわかります。
ブロックのタイトル横に表示されていたアイコンは、iconの値がsmileyになっていることから、スマイルマークが表示されているのだと推測できます。
またcategoryの値が、widgetsになっているため、ブロックの挿入でwidgetセクションに表示されていたのだとわかります。
ブロックサポートの追加
WordPressのブロックエディター追加できるブロック用のカスタム機能です。
block.jsonファイル内のsupportsセクションを更新することによって、機能の追加や削除が行えます。
"supports": {
    "color": {
        "background": false,
        "text": true
    },
    "html": false,
    "typography": {
        "fontSize": true
    }
},
変更を加える際に、ターミナルで以下のコマンドを実行しておくと、変更が自動で反映されるようになります。
npm startnpm startを終了するためには、control + Cを入力します。
エディターのブロックの設定項目を確認してみます。次のようにテキストの色とフォントサイズが選択できるようになっています。
ブロックのファイル構成
ブロックエディターを開発するための流れや簡単なカスタマイズを確認しました。
ブロックがどのようなファイル構成からできているか確認をしていきます。
参考:ブロックのファイル構成
<plugin-file>.phppackage.jsonsrcフォルダbuildフォルダ
<plugin-file>.php
自身でブロックを開発される場合は、基本的にはプラグインとして作成することになります。このファイルにブロック登録用のregister_block_type()関数を記載して、ブロックを登録することになります。
package.json
確認中
srcフォルダ
ブロック開発では、srcフォルダにコンパイルされていない生のコードを格納します。wp-scriptsによって、ビルドが行われて、後で解説するbuildフォルダが出来上がります。
src フォルダのファイル構成は以下になります。
block.jsonindex.jsedit.jssave.jsstyle.(css|scss|sass)editor.(css|scss|sass)render.phpview.js
block.json
ブロックのメタデータを含むファイルです。
ビルド後に指すファイルを指定する?
{
	"$schema": "https://schemas.wp.org/trunk/block.json",
	"apiVersion": 3,
	"name": "create-block/myblock",
	"version": "0.1.0",
	"title": "Myblock",
	"category": "widgets",
	"icon": "smiley",
	"description": "Example block scaffolded with Create Block tool.",
	"example": {},
	"supports": {
		"color": {
			"background": false,
			"text": true
		},
		"html": false,
		"typography": {
			"fontSize": true
		}
	},
	"textdomain": "myblock",
	"editorScript": "file:./index.js",
	"editorStyle": "file:./index.css",
	"style": "file:./style-index.css",
	"viewScript": "file:./view.js"
}
index.js
ブロックエディターでロードされるファイルです。ブロックを登録するためのregisterBlockType関数の呼び出し、edit.jsおよびsave.jsのインポートを行います。
/**
 * Registers a new block provided a unique name and an object defining its behavior.
 *
 * @see https://developer.wordpress.org/block-editor/reference-guides/block-api/block-registration/
 */
import { registerBlockType } from '@wordpress/blocks';

/**
 * Lets webpack process CSS, SASS or SCSS files referenced in JavaScript files.
 * All files containing `style` keyword are bundled together. The code used
 * gets applied both to the front of your site and to the editor.
 *
 * @see https://www.npmjs.com/package/@wordpress/scripts#using-css
 */
import './style.scss';

/**
 * Internal dependencies
 */
import Edit from './edit';
import save from './save';
import metadata from './block.json';

/**
 * Every block starts by registering a new block type definition.
 *
 * @see https://developer.wordpress.org/block-editor/reference-guides/block-api/block-registration/
 */
registerBlockType( metadata.name, {
	/**
	 * @see ./edit.js
	 */
	edit: Edit,

	/**
	 * @see ./save.js
	 */
	save,
} );
edit.js
ブロックエディターで扱うブロックの内容の決定や設定を行います。
/**
 * Retrieves the translation of text.
 *
 * @see https://developer.wordpress.org/block-editor/reference-guides/packages/packages-i18n/
 */
import { __ } from '@wordpress/i18n';

/**
 * React hook that is used to mark the block wrapper element.
 * It provides all the necessary props like the class name.
 *
 * @see https://developer.wordpress.org/block-editor/reference-guides/packages/packages-block-editor/#useblockprops
 */
import { useBlockProps } from '@wordpress/block-editor';

/**
 * Lets webpack process CSS, SASS or SCSS files referenced in JavaScript files.
 * Those files can contain any CSS code that gets applied to the editor.
 *
 * @see https://www.npmjs.com/package/@wordpress/scripts#using-css
 */
import './editor.scss';

/**
 * The edit function describes the structure of your block in the context of the
 * editor. This represents what the editor will render when the block is used.
 *
 * @see https://developer.wordpress.org/block-editor/reference-guides/block-api/block-edit-save/#edit
 *
 * @return {Element} Element to render.
 */
export default function Edit() {
	return (
		<p { ...useBlockProps() }>
			{ __( 'Myblock – hello from the editor!', 'myblock' ) }
		</p>
	);
}
save.js
WordPressデータベースに保存される静的なHTMLマークアップを取り決めます。
/**
 * React hook that is used to mark the block wrapper element.
 * It provides all the necessary props like the class name.
 *
 * @see https://developer.wordpress.org/block-editor/reference-guides/packages/packages-block-editor/#useblockprops
 */
import { useBlockProps } from '@wordpress/block-editor';

/**
 * The save function defines the way in which the different attributes should
 * be combined into the final markup, which is then serialized by the block
 * editor into `post_content`.
 *
 * @see https://developer.wordpress.org/block-editor/reference-guides/block-api/block-edit-save/#save
 *
 * @return {Element} Element to render.
 */
export default function save() {
	return (
		<p { ...useBlockProps.save() }>
			{ 'Myblock – hello from the saved content!' }
		</p>
	);
}
style.(css|scss|sass)
ブロックエディターとフロントエンドの両方に読み込まれるスタイルが含まれます。
/**
 * The following styles get applied both on the front of your site
 * and in the editor.
 *
 * Replace them with your own styles or remove the file completely.
 */

.wp-block-create-block-myblock {
	background-color: #21759b;
	color: #fff;
	padding: 2px;
}
editor.(css|scss|sass)
ブロックエディターのブロックで適用されるスタイルが含まれます。
/**
 * The following styles get applied inside the editor only.
 *
 * Replace them with your own styles or remove the file completely.
 */

.wp-block-create-block-myblock {
	border: 1px dotted #f00;
}
render.php
フロントエンドからのリクエストに対して、データベースに保存された静的なHTMLマークアップをどのように返すか、サーバー側の処理を定義します。静的なHTMLマークアップを動的なHTMLマークアップに変更したい場合に使用されます。
npx @wordpress/create-block@latest myblock を実行した場合、render.phpファイルは生成されません。
npx @wordpress/create-block@latest myblock2 --variant dynamic のようにオプションとして、--variant dynamicを追加すると、render.phpファイルが追加されます。
<?php
/**
 * @see https://github.com/WordPress/gutenberg/blob/trunk/docs/reference-guides/block-api/block-metadata.md#render
 */
?>
<p <?php echo get_block_wrapper_attributes(); ?>>
	<?php esc_html_e( 'Myblock2 – hello from a dynamic block!', 'myblock2' ); ?>
</p>
view.js
ブロックが読み込まれる際に、フロントエンドで読み込まれるファイルです。
/**
 * Use this file for JavaScript code that you want to run in the front-end
 * on posts/pages that contain this block.
 *
 * When this file is defined as the value of the `viewScript` property
 * in `block.json` it will be enqueued on the front end of the site.
 *
 * Example:
 *
 * ```js
 * {
 *   "viewScript": "file:./view.js"
 * }
 * ```
 *
 * If you're not making any changes to this file because your project doesn't need any
 * JavaScript running in the front-end, then you should delete this file and remove
 * the `viewScript` property from `block.json`.
 *
 * @see https://developer.wordpress.org/block-editor/reference-guides/block-api/block-metadata/#view-script
 */

/* eslint-disable no-console */
console.log( 'Hello World! (from create-block-myblock block)' );
/* eslint-enable no-console */
build フォルダ
srcフォルダのコードをコンパイルした、バージョンが格納されます。
ビルドプロセスによって生成される内容のため、開発時に自身でこのフォルダ内のファイルを変更することは基本的にありません。
block.json
ユーザーの設定の永続化
ユーザーの設定を永続化したい場合に、attributesを用います。
"attributes": {
    "fallbackCurrentYear": {
        "type": "string"
    },
    "showStartingYear": {
        "type": "boolean"
    },
    "startingYear": {
        "type": "string"
    }
},
ブロックのカスタマイズ
ブロックの汎用的なカスタマイズは、supportsを使用します。
"supports": {
    "color": {
        "text": true,
        "link": true,
        "background": true
    }
}
初めてのブロック開発
チュートリアル: はじめてのブロック作成を参考に進めていきます。
完成系は以下のようなに、コピーライトの年号を表示するブロックです。
以下のコマンドを実行することで完成系のファイルを確認できます。--template <template>オプションを利用することで、雛形を指定することができます。
npx @wordpress/create-block copyright-date-block --template @wordpress/create-block-tutorial-templateここでは、同様の機能を持つブロックを一から開発していきます。
npx @wordpress/create-block@latest copyright-date-block --variant=dynamic--variant=dynamicを指定することで、render.phpファイルが作成されます。
続いて作業ディレクトリへ移動しておきます。
cd copyright-date-blockwp-env startコマンドを実行します。
wp-env startWordPressがインストールされ、管理画面にアクセスできるようになります。
⚠ Warning: could not find a .wp-env.json configuration file and could not determine if '/Users/xxx/Documents/Development/WordPress/copyright-date-block' is a WordPress installation, a plugin, or a theme.
WordPress development site started at http://localhost:8888
WordPress test site started at http://localhost:8889
MySQL is listening on port 63963
MySQL for automated testing is listening on port 63975

 ✔ Done! (in 21s 729ms)
{
	"$schema": "https://schemas.wp.org/trunk/block.json",
	"apiVersion": 3,
	"name": "create-block/copyright-date-block",
	"version": "0.1.0",
	"title": "Copyright Date Block",
	"category": "widgets",
	"icon": "smiley",
	"description": "Example block scaffolded with Create Block tool.",
	"example": {},
	"supports": {
		"html": false
	},
	"textdomain": "copyright-date-block",
	"editorScript": "file:./index.js",
	"editorStyle": "file:./index.css",
	"style": "file:./style-index.css",
	"render": "file:./render.php",
	"viewScript": "file:./view.js"
}- iconを削除
- descriptionの変更
{
	"$schema": "https://schemas.wp.org/trunk/block.json",
	"apiVersion": 3,
	"name": "create-block/copyright-date-block",
	"version": "0.1.0",
	"title": "Copyright Date Block",
	"category": "widgets",
	"description": "Display your site’s copyright date.",
	"example": {},
	"supports": {
		"html": false
	},
	"textdomain": "copyright-date-block",
	"editorScript": "file:./index.js",
	"editorStyle": "file:./index.css",
	"style": "file:./style-index.css",
	"render": "file:./render.php",
	"viewScript": "file:./view.js"
}
ブロックエディターを確認します。
block.jsonの変更が反映されていることがわかります。
チュートリアルに沿って、変更して以下のような記述にします。
{
    "$schema": "https://schemas.wp.org/trunk/block.json",
    "apiVersion": 3,
    "name": "create-block/copyright-date-block",
    "version": "0.1.0",
    "title": "Copyright Date Block",
    "category": "widgets",
    "description": "Display your site's copyright date.",
    "example": {},
    "supports": {
        "color": {
            "background": false,
            "text": true
        },
        "html": false,
        "typography": {
            "fontSize": true
        }
    },
    "textdomain": "copyright-date-block",
    "editorScript": "file:./index.js",
    "render": "file:./render.php"
}続いて、index.jsを修正します。
edit.js
export default function Edit() {
    return (
        <p { ...useBlockProps() }>
            { __(
                'Copyright Date Block – hello from the editor!',
                'copyright-date-block-demo'
            ) }
        </p>
    );
}
export default function Edit() {
const currentYear = new Date().getFullYear().toString();
return <p {...useBlockProps()}>© {currentYear}</p>;
}ブロックエティダーで確認します。
一方で、投稿をフロントエンドで確認すると、のままです。
render.phpを確認します。
<p <?php echo get_block_wrapper_attributes(); ?>>
	<?php esc_html_e( 'Copyright Date Block – hello from a dynamic block!', 'copyright-date-block' ); ?>
</p>
<p <?php echo get_block_wrapper_attributes(); ?>>© <?php echo date( "Y" ); ?></p>投稿の表示を確認します。ブロックエディターと同じ表示内容になっていることが確認できます。
最初の例で示したように公開年を指定できるようにします。
この機能を作成するためには、ユーザーによる公開年の入力が必要です。また公開年の表示・非表示の切り替えも必要になるでしょう。
この二つの機能を実装するには、データの保存が必要となります。データの保存にはブロック属性を利用します。
公開年を保持しておくブロック属性と、公開年の表示の有無を保持するブロック属性が必要になります。
ブロック属性の保持には、まずblock.jsonを修正します。
exampleプロパティの後に必要なブロック属性の記述を行います。
	"example": {},
	"attributes": {
		"showStartingYear": {
			"type": "boolean"
		},
		"startingYear": {
			"type": "string"
		}
	},
	"supports": {
ブロックエディターで上記二つのブロック属性をユーザーが指定できるようにします。
ブロックにおいてブロックサポートはWordPressが提供するデフォルトのカスタム機能を追加できるものでした。
独自のカスタム機能を追加したい場合は、InspectorControlsコンポーネントを利用します。
InspectorControlsコンポーネントは、@wordpress/block-editorに含まれています。そのため次の記述にInspectorControlsを加えることでインポートが行えます。
import { useBlockProps } from "@wordpress/block-editor";import { InspectorControls, useBlockProps } from '@wordpress/block-editor';edit.js内にあるEdit関数の修正を行います。
return <p {...useBlockProps()}>© {currentYear}</p>; return (
<>
<InspectorControls>
Testing
</InspectorControls>
<p { ...useBlockProps() }>© { currentYear }</p>
</>
);ブロックエディターで確認します。
Testingの文字列が表示されていることが確認できます。
続いて、ユーザーインターフェース追加のために幾つかのコンポーネントをインポートします。
インポートするのは、PanelBody、TextControl、ToggleControlコンポーネントです。これらのコンポーネントは、@wordpress/componentsパッケージからインポートできます。
edit.jsファイルに、以下の記述を追加します。
import { PanelBody, TextControl, ToggleControl } from '@wordpress/components';InspectorControlsの記述を以下のように変更します。
            <InspectorControls>
                <PanelBody title={ __( 'Settings', 'copyright-date-block' ) }>
                    Testing
                </PanelBody>
            </InspectorControls>
次のように開閉可能なパネルが表示されます。
次にユーザーが公開年を入力できるように変更を行います。これには、TextControlコンポーネントを利用します。
その前に必要な変数を利用できるようにするために、Edit関数の修正および変数の宣言をしておきます。
export default function Edit( { attributes, setAttributes } ) {
    const { showStartingYear, startingYear } = attributes;
TextControlを利用して、記述を行います。
<PanelBody title={ __( 'Settings', 'copyright-date-block' ) }>
<TextControl
__nextHasNoMarginBottom
__next40pxDefaultSize
label={ __(
'Starting year',
'copyright-date-block'
) }
value={ startingYear || '' }
onChange={ ( value ) =>
setAttributes( { startingYear: value } )
}
/>
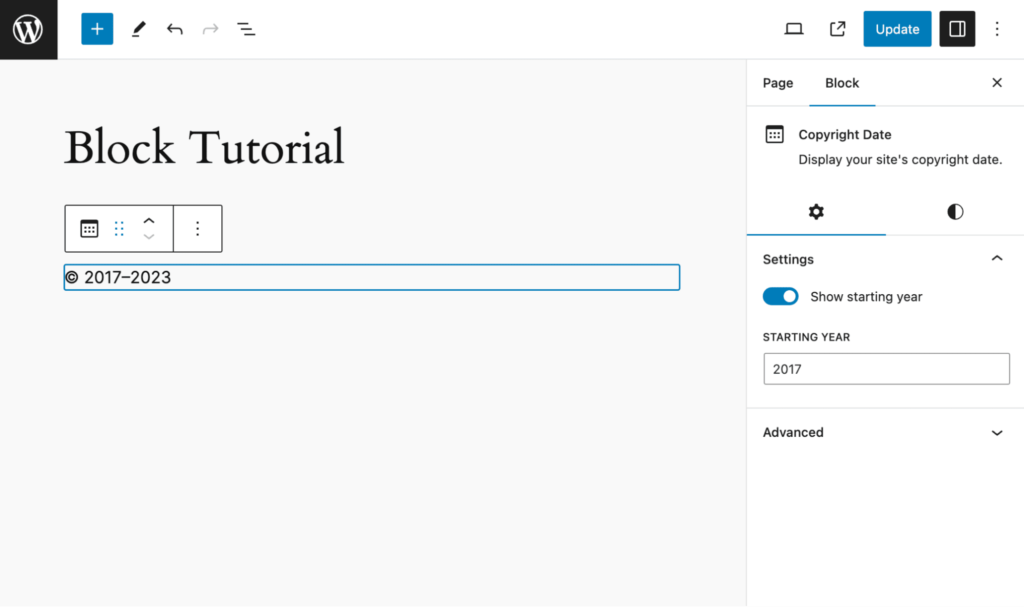
</PanelBody>ブロックエディターを確認します。
公開年の入力欄が確認できます。またデータの保存も確認しておきましょう。
続いて、トグルによる表示・非表示の機能を実装します。トグルはToggleControlコンポーネントを利用します。
                   <ToggleControl
                        checked={ !! showStartingYear }
                        label={ __(
                            'Show starting year',
                            'copyright-date-block'
                        ) }
                        onChange={ () =>
                            setAttributes( {
                                showStartingYear: ! showStartingYear,
                            } )
                        }
                    />
{ showStartingYear && (
<TextControl
__nextHasNoMarginBottom
__next40pxDefaultSize
label={ __(
'Starting year',
'copyright-date-block'
) }
value={ startingYear || '' }
onChange={ ( value ) =>
setAttributes( { startingYear: value } )
}
/>
) }これでユーザーインターフェースの実装が完了しました。
ここからは、ブロックエディターで表示される内容について実装を行なっていきます。
ブロックエディターなので、編集するファイルはedit.jsになります。
まずは表示する年を表す変数displayDateを宣言します。続いて、displayDateに代入する値を決める式を記載します。
showStartingYearがtrueかつstartingYearの指定があれば、公開年と現在年を-で区切って表示します。それ以外の場合は、現在の年を表示します。
以下のようになります。
let displayDate;

if ( showStartingYear && startingYear ) {
    displayDate = startingYear + '–' + currentYear;
} else {
    displayDate = currentYear;
}
上記をもとにして、Edit()関数を修正します。
export default function Edit( { attributes, setAttributes } ) {
    const { showStartingYear, startingYear } = attributes;
    const currentYear = new Date().getFullYear().toString();

    let displayDate;

    if ( showStartingYear && startingYear ) {
            displayDate = startingYear + '–' + currentYear;
    } else {
        displayDate = currentYear;
    }

    return (
        <>
            <InspectorControls>
                <PanelBody title={ __( 'Settings', 'copyright-date-block' ) }>
                    <ToggleControl
                        checked={ !! showStartingYear }
                        label={ __(
                            'Show starting year',
                            'copyright-date-block'
                        ) }
                        onChange={ () =>
                            setAttributes( {
                                showStartingYear: ! showStartingYear,
                            } )
                        }
                    />
                    { showStartingYear && (
                        <TextControl
                            label={ __(
                                'Starting year',
                                'copyright-date-block'
                            ) }
                            value={ startingYear || '' }
                            onChange={ ( value ) =>
                                setAttributes( { startingYear: value } )
                            }
                        />
                    ) }
                </PanelBody>
            </InspectorControls>
            <p { ...useBlockProps() }>© { displayDate }</p>
        </>
    );
}
ブロックエディターで表示を確認します。
トグルがオンとオフの時でエディターの表示が変わっていることが確認できます。
続いて、フロントエンドでの表示を修正します。上記のEdit()関数で行ったことを同じことをPHPで行います。
if ( ! empty( $attributes['startingYear'] ) && ! empty( $attributes['showStartingYear'] ) ) {
    $display_date = $attributes['startingYear'] . '–' . $current_year;
} else {
    $display_date = $current_year;
}
render.phpファイルの記述は以下のようになります。
<?php
$current_year = date( "Y" );

if ( ! empty( $attributes['startingYear'] ) && ! empty( $attributes['showStartingYear'] ) ) {
    $display_date = $attributes['startingYear'] . '–' . $current_year;
} else {
    $display_date = $current_year;
}
?>
<p <?php echo get_block_wrapper_attributes(); ?>>
    © <?php echo esc_html( $display_date ); ?>
</p>
フロントエンドでの表示を確認します。
これまではrender.phpを利用して、動的に出力を決めています。
動的にレンダリングする手法は、ブロックのマークアップと属性はデータベースに保存されますが、HTMLマークアップは保存されません。
ブロックのマークアップとは以下のような記述です。
<!-- wp:create-block/copyright-date-block {"showStartingYear":true,"startingYear":"2000"} /-->静的レンダリングを追加しておけば、プラグインが削除された後もHTMLコンテンツを残すことができます。
静的レンダリングは、save.jsファイルで行います。
import { useBlockProps } from '@wordpress/block-editor';

export default function save() {
    return (
        <p { ...useBlockProps.save() }>
            { 'Copyright Date Block – hello from the saved content!' }
        </p>
    );
}
上記のファイルを作成した後に、index.jsファイルに以下の記述を行います。
import save from './save';

...

registerBlockType( metadata.name, {
    icon: calendarIcon,
    edit: Edit,
    save
} );
Attempt recoveryをクリックすると、以下のように変わります。
<!-- wp:create-block/copyright-date-block {"showStartingYear":true,"startingYear":"2000"} -->
<p class="wp-block-create-block-copyright-date-block">Copyright Date Block – hello from the saved content!</p>
<!-- /wp:create-block/copyright-date-block -->
フロントエンドでは表示が変わっていないことが確認できます。
export default function save( { attributes } ) {
    const { showStartingYear, startingYear } = attributes;
    const currentYear = new Date().getFullYear().toString();

    let displayDate;

    if ( showStartingYear && startingYear ) {
        displayDate = startingYear + '–' + currentYear;
    } else {
        displayDate = currentYear;
    }

    return (
        <p { ...useBlockProps.save() }>© { displayDate }</p>
    );
}
ブロックエディターで保存すると以下のように変わっています。
<!-- wp:create-block/copyright-date-block {"showStartingYear":true,"startingYear":"2000"} -->
<p class="wp-block-create-block-copyright-date-block">© 2000–2025</p>
<!-- /wp:create-block/copyright-date-block -->
静的レンダリングと動的レンダリングの両方を使う際に、バリデーションエラーが表示されることがあります。
2024年に保存したブロックを2025年に更新したいときです。
この対処を行います。
問題は静的レンダリングを行うsave()関数で、動的な変数であるcurrentYearが利用されていることです。
新たな変数として、設定します。まずは属性を追加するためにblock.jsonを変更します。
"attributes": {
    "fallbackCurrentYear": {
        "type": "string"
    },
    "showStartingYear": {
        "type": "boolean"
    },
    "startingYear": {
        "type": "string"
    }
},
export default function save( { attributes } ) {
const { fallbackCurrentYear, showStartingYear, startingYear } = attributes;
let displayDate;
if ( showStartingYear && startingYear ) {
displayDate = startingYear + '–' + fallbackCurrentYear;
} else {
displayDate = fallbackCurrentYear;
}
return (
<p { ...useBlockProps.save() }>© { displayDate }</p>
);
}export default function save( { attributes } ) {
const { fallbackCurrentYear, showStartingYear, startingYear } = attributes;
if ( ! fallbackCurrentYear ) {
return null;
}
let displayDate;
if ( showStartingYear && startingYear ) {
displayDate = startingYear + '–' + fallbackCurrentYear;
} else {
displayDate = fallbackCurrentYear;
}
return (
<p { ...useBlockProps.save() }>© { displayDate }</p>
);
}続いて、save()関数で利用するfallbackCurrentYearをEdit()関数にも組み込みます。
export default function Edit({ attributes, setAttributes }) {
	const { fallbackCurrentYear, showStartingYear, startingYear } = attributes;

	// 現在の年を取得し、文字列であることを確認する
	const currentYear = new Date().getFullYear().toString();

	// ブロックロードのとき、fallbackCurrentYear がまだ設定されていなければ、
	// 現在の年に設定する
	useEffect(() => {
		if (currentYear !== fallbackCurrentYear) {
			setAttributes({ fallbackCurrentYear: currentYear });
		}
	}, [currentYear, fallbackCurrentYear, setAttributes]);
ブロックロードの際に利用するuseEffectは、reactからインポートします。
import { useEffect } from "react";